BioNetLab Asynchronous Annotator Help
- Getting Started
- The BioNetLab Startup Screen
- Open an Image in the Annotator
- Annotation: Drawing a Polygon over an object
- Naming the new Object
- Annotation: Copy an annotation from adjacent section
- Adjusting the shape of an Object: Moving a vertex
- Adjusting the shape of an Object: Adding an vertex
- The Object Name List -- Identifying Objects
- Choose Outlining and Fill Colors
- Useful Keyboard Functions
The annotator file together with a file Jpeg62.dll are located in a folder named BioNetLab.
As the annotater is used, image files are cached in this folder.
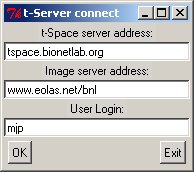 When the annotator is launched you will be prompted to type your approved login name in a t-Server connect window. You will be alerted that it may (depending on your bandwidth) take several minutes while the shared database is initialized.
Back to top
 Back to top
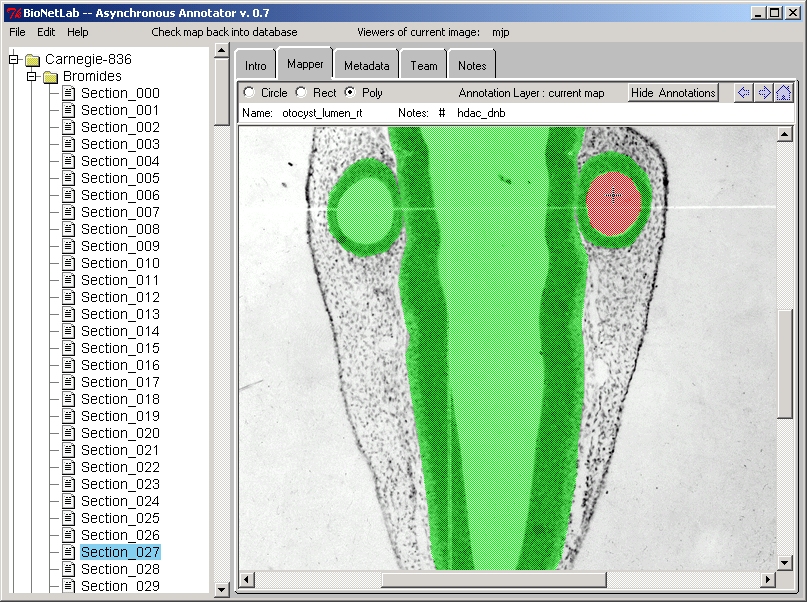
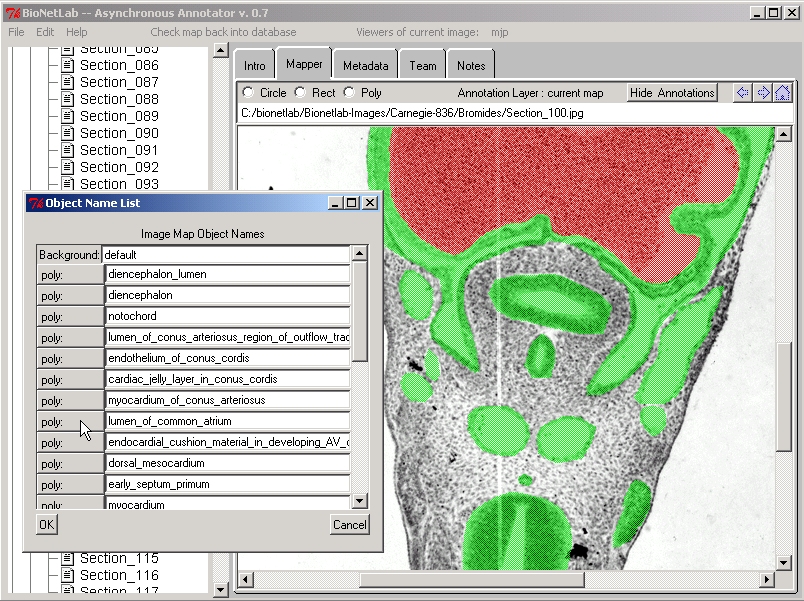
The Mapper tab opens the annotator function. An image can be opened in two ways. Browse to select an image in the image archive list on the left. Right clicking on the image opens the image for editing. While the image map is checked out in this manner, it cannot be edited by anyone else, although it can be opened for viewing only by left clicking. The following image has been opened by right clicking as indicated by the Check map back into database announcement on the menu bar. It is necessary to press Check map back into database when the annotation is finished. While checked out it is unavailable for annotating by anyone else. Left clicking opens the image for viewing only. The menu bar will indicate Current annotator: available when an image is not currently checked out. Multiple users can view the same image simultaneously and are listed in the Viewers of current image slot on the menu bar.
All annotated structures are colored green. As the cursor passes over an object in the image, the object will be highlighted in red and the object name will appear in the white box above the image. The object name is then displayed in the white name bar above the image along with any annotations associated with this object.
When the map is checked back into the database a copy of the mapfile will automatically be saved to the local cache as a backup. A copy can also be saved at any time by pressing File|Save Local Copy of Map File or by pressing Control-S.
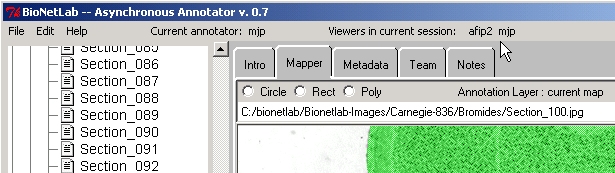
The following window indicates that the map is currently checked out by mjp for editing, but afip2 has the image open for viewing.
Back to top

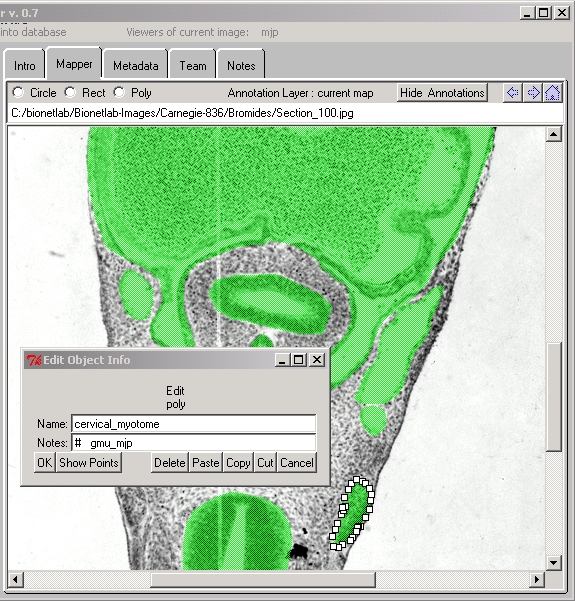
First of all The Poly radio button must be checked. Although it possible to draw circles and rectangles, these are not typically found in embryos. Click on a point on the border of the object you want to annotate. A small white square appears at the point where a polygon is started. After the polygon is started, line segments join the points that you create as you click around the object. Complete the polygon by clicking on the small white square. Click "OK" in the Edit Object Info Window to save or "Cancel" to delete the object. You can save a local copy of the map at any time by pressing File|Save Local Copy of Map File or by pressing Control-S, however, the changes will not be written to the database until you press Check map back into database.
When you start a polygon a white square must appear. If it does not, then an object was not started.
Once a polygon is created, and before it is completed, it can be erased by right clicking if you want to start over.
Be careful that the cursor does not inadvertently start an object. If one does, be sure to right click it away.
When you complete the polygon it will instantly be painted blue. Click on the blue object and the "Edit Object Info" window will appear so you can name the new object.
Back to top
Click on the object you have just created to open the "Edit Object Info" window. The color of the object will change to red and the points of the polygon will be displayed. Give the object a unique name and you may add additional info in the "Notes" space.
Back to top
Sometimes it is useful to copy an annotation of a structure from an adjacent structure. In some cases it is possible to make minor adjustments to the annotations from the adjacent structure rather than having to make a new annotation. Also, it is often useful in cases where a judgement must be made about a junction between two structures.
To copy an object from one section to another, check out the source section, open the object for editing, click the "Copy" button,
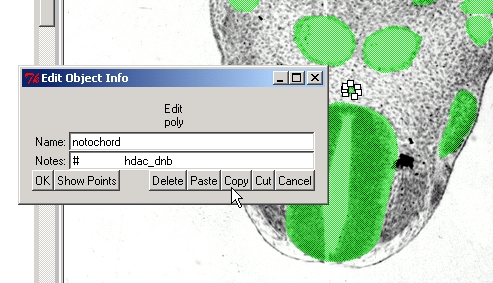
check out the destination image, paste the object with Ctrl-v.
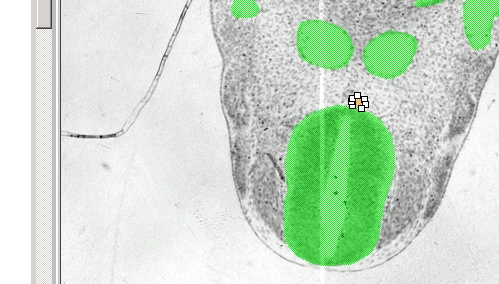
The pasted object will be colored orange.
Click on the object to bring up the Edit Object Info window and press OK. The object color will change to green. You can then adjust the position of the annotation by holding down the Shift key and the left mouse button.

Back to top
Once an object is open for editing, individual points (vertices) in the polygon can be adusted by holding down the Ctrl + Left mouse button while moving the point with the cursor. You must Click OK on the Edit Object Info Window in order for changes to be saved!
Back to top
Click on the object to display the points. Place the cursor over the point to be replicated; hold down the Alt + Left mouse button while moving the point with the cursor. Move the white square representing the vertex to the desired position and release the mouse button. When you move the point, the white square representing the original point will not be visible. However, after you click the image or hit OK, and then click on the object again, the new vertex as well as the original one will be visible. You must Click OK on the Edit Object Info Window in order for changes to be saved!
Back to top
File|List Object Names opens an Object Name list, which shows all annotated objects. Click on the "poly" button adjacent to an object and it will be highlighted in red.
Back to top
Currently the default color of line segments while annotating an object is white. This color can be changed by selecting Edit|Choosing Outline and Fill Colors... It is especially useful to change the color from white when annotating black and white bromide images. The fill colors of the polygons can also be changed here.
Back to top
- Move a vertex: Control + Left mouse button
- Add a new vertex: Place cursor over vertex to be replicated;
Alt + Left mouse button
- Drag an existing object: Shift + Left mouse button
- Save a local copy of a map file: Control-S
Back to top
Helpfile written by Maurice Pescitelli Jr
maury@bionetlab.org
Software written by Mike Doyle, of Eolas Technologies Inc.
mike@eolas.com
Last modified 1 August, 2002 10:58AM EDT for version bionetlab1p.exe