
MENU
MISTC Home
Dowloading--
System Rqmts
Client Downloads
Server Download
Using--
Help
Problems & Ideas
MISTCFeatures
Presenter Guide
FAQs
Documents--
Documentation
MISTCPeople
Related Websites--
MoodleTM
NetLab Home
GUIDE FOR MISTC
BREAKOUT GROUPS
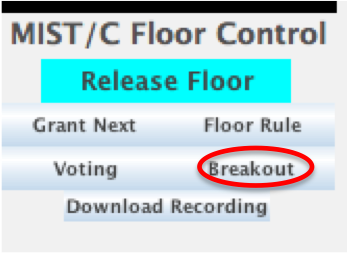
If your MISTC
client and server are configured for using breakout groups of online users and you are an instructor, your
control panel will display the Breakout button (see illustration below) when you take the floor. The Breakout
button is used for entering the
MISTC breakout mode by providing the Breakout Group Manager panel. Please note that only one Breakout panel
can be active at any given time, even if multiple instructors are connected.
Configuring Breakout Groups
MISTC will divide the
users into groups or the instructor may determine which online users will be grouped together by choosing the number
of groups and assigning each user to a group. The groups may be configured before the class session and saved or
they may be configured while the class session is underway. (To configure the groups--or change them--before the class
is in session, the instructor just needs to enter the MISTC classroom, take the floor, and use the
Breakout button to see the Breakout Manager panel.)
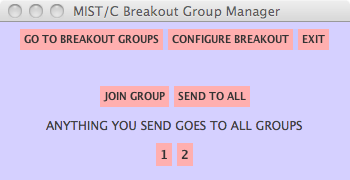
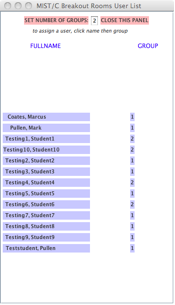
Use the CONFIGURE BREAKOUT button on the
Breakout Manager panel to display the Breakout Rooms User List panel (see illustration below). Next, use the text box to
indicate the number of groups desired and click on the
SET NUMBER OF GROUPS button. The group
numbers will then appear on the Breakout Group Manager panel.
Now, assign each online user to a group. Select the user on the List panel then then select the group number
on the Breakout Manager panel. The assigned group numbers will then appear in the second column
on the List panel. as well as the first character in the Participants list on the
MISTC panel. If you
wish to change a user from one group to another, just select the user in the list and select the new group number on
the Breakout Manager panel.
Using Breakout Groups
When the breakout groups have been configured, use the
GO TO BREAKOUT GROUPS button on the
Breakout Manager panel to split the users into your
MISTC
breakout groups or to update the groups. Online users will see that the first character in the Participants list on the
MISTC panel is now
the group number. Online users will be able to take the floor freely in their own group but cannot communicate with
those in the other groups. The Participant list seen by each group shows its own group members names with a green background
and all others with a white background.
As instructor, you will not be placed into a group and you will no longer have the floor. If you want to address the whole
class, you need to press the SEND TO ALL button and
request the floor.
If you wish to join a group, press the
JOIN GROUP button. The Breakout Group Manager will now say CLICK GROUP TO JOIN. Select the group you
wish to join from the list of group numbers. When you join a group, the group number will appear beside your name in the
Participants list and your Breakout Group Manager will say YOU ARE NOW IN GROUP n. You will not have the floor in
the group unless you request it.

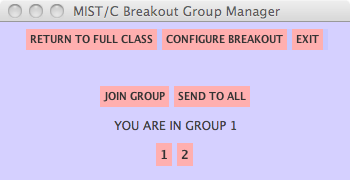
If you wish to leave a group you have joined, press the SEND TO ALL button. You will no longer be in the group and your Breakout Group Manager will say ANYTHING YOU SEND GOES TO ALL GROUPS. You will still need to request the floor to actually "send to all."