Tools
- Video Tool (Vic)
- Audio Tool (VAT or RAT)
- SDR (sessions directory)
- White Board
- Mtrace
- Mrouted
PS: To do this on the machines in Europe untar the file MBone.tar in /space This will put all the required software in /space/MBone. Then make a softlink (using ln -s) of all the executables to an existing binary directory(like /usr/bin or /usr/sbin).
The directories found in MBone obtained by untarring MBone.tar are
- sdr
- VIC with executable vic in it
- vat with executable vat in it
- rat
- wboard
If you want to transmit text use white board. We don't have any text tools installed.
To start an MBone session type the command sdr.
CAUTION: Make sure sdr is in your path. Also make sure that the video tool audio tool and the white board are in your path. Otherwise sdr will not be able to invoke video and audio tools as soon as sdr is invoked. You will have to invoke them manually. So please make sure all these files are in your path.
You will get a sessions directory interface.
To participate in
a session click on the session you want to join.
You will get an interface.
Click on join to join the session.
If you have more than one audio tool you will get an interface asking
which audio tool you want to use. Click on the audio tool you want to
use.
You will also get the video tool.
New sessions can be created by pressing the "New'' button on the sdr main window. Every session must have a name, a short description, a scope, contact information, a start time and a stop time. In addition, sessions may optionally also possess links to further information in the world wide web, a number of detailed media descriptions, and more detailed timing information.
When you click on the 'New' button on the sdr interface you will get an interface where various fields have to be filled in.
This is description of various fields.
Give a name for the session.
You should give a description for your session.
Links to the World Wide Web
A session announcement can contain an Uniform Resource Locator (URL) as a link to related information in the world wide web. The preferences menu determines how sdr follows such references - three options are supported:
- Using the simple built in WWW browser
- Starting an external browser such as Netscape or Mosaic
- Directing an already running external browser to the URL (Mosaic and Netscape permit this sort of remote control operation)
If you have an color display of depth 8 bits, using the built in browser is recommended as external browsers use a significant number of the 256 available colors, leaving you with few colors remaining for any tools you wish to use in a multimedia conference. If you have a 24bit display, external browsers are likely to provide you with better performance and prettier displays than the built-in browser. When creating a session, it is recommended that the URL be tested (using the Test button) as typing mistakes here will make the URL useless.
You can test the URL by clicking on the test URL button.
Media descriptions are the main reason for describing a session, as they allow the receiver of an announcement to start the correct media tools directly from sdr with all the correct flags and settings to join the conference. Sdr allows you to create conferences with up to one media tool of each of the following types:
- audio
- video
- whiteboard (including shared editors)
- text
In fact sdr can receive and start sessions with more than one of each media, but the standard interface does not permit the creation of such sessions in an effort to make the session creation interface simpler to use. To include a media in your session, select the media by clicking on the left "X'' button When a media is selected, a default media format will be selected, along with default addresses, transport protocol and ports. The media format and transport protocol can be changed using the relevant pull down menus. The address and port are allocated in such a way that they should avoid clashes with other scheduled sessions - the addresses sdr provides should normally be used, although user specified ones can be substituted if required. In particular, ports are chosen such that rate-limiting in MBone routers will preferentially forward audio rather than video when a multicast tunnel is congested. If everyone you expect to participate in your session is likely to wish to receive all the media you have selected, then using one multicast address for all your media is appropriate. If some receivers are likely to not wish to receive some media - for example some sites have insufficient bandwidth to receive video - then selecting one multicast address per media is appropriate as this permits unwanted traffic to be pruned back from these low bandwidth participant sites.
A7) Sessions will take place........
Detailed Timing:
If your session is not going to be active continuously between its start and stop times, then this detailed timing information should be provided so that users that wish to participate know the precise times, and users that do not wish to participate can know when to expect your traffic to be active.
Sdr allows you to specify up to three active times or repeat intervals for your session - each active time or repeat interval specifies an addition set of times when the session will be active. The limit of three is not imposed by the protocol - if sdr receives an announcement with more than three repeat times it can decode and display it - but rather to simplify the user interface for session creation.
Each scope range (whether TTL scoped or administratively scoped) has a recommended maximum bandwidth associated with it. This is the maximum bandwidth a session should use at that scope. Most of the MBone is currently configured for only a small number of concurrent sessions, (although this is likely to change as the MBone is increasingly provided using native multicast in routers rather than an overlay of multicast tunnels). For this reason it is important to be able to see if a session I wish to schedule will clash with other sessions already scheduled, and to automatically set the maximum bandwidth of the tools to comprise my session.
Unfortunately many users do not know sufficient about the network to be able to decide on appropriate bandwidth figures for their session. To get around this, sdr allows users to specify their sessions as "meetings'' or as "broadcasts'', and lets the audio and video rates be set as "low'', "normal'' and "other'', where "other'' requires that a bandwidth value be inserted. "meetings'' also allow the user to specify "number of simultaneous video streams''. Sdr users this information to set fields indicating the total bandwidth of the conference and the bandwidth to be used by each tool in the conference.
If a user attempts to schedule a session that will exceed the recommended available bandwidth for that scope (based on what other sessions are scheduled) then it will issue a warning and indicate which other session the new session will clash with.
TTL Scope is constrained by the "Time To Live'' (TTL) field in the IP packets a multicast application sends. An application sends its data with a fixed TTL. Each multicast router that the data traverses decreases the TTL on the packets by one. Each multicast router also has a threshold associated with each multicast capable interface or multicast tunnel. If the TTL on the data packets arriving at a router is lower that the threshold of the interface or tunnel, then the packet is not forwarded out of that interface.
The multicast tunnels comprising the MBone are configured so that it is possible to constrain a conference to a particular region of the MBone by careful setting of the TTL. Thus the multicast tunnels in Europe are generally configured with the following thresholds:
Low Speed Tunnels:
128
Intercontinental: 64
International (within Europe): 48
Between institutions: 16-32 depending on the links involved
Within an institution: 1-16
Thus if I'm sending from the UK, and want my traffic to reach Europe only, I would send with a TTL of 63, which would traverse the international tunnels but not the intercontinental ones.
Click on menu to change the settings of the audio tool. You can click on help if you need help. Be careful to see that your speakers are not muted when you are listening. If you want to connect to external speaker device be careful to set to external device. To change these options click on the speaker icon. If you want to talk click on talk. If you want to transmit audio you have to follow the following steps.
- You have to create the session you want to transmit.
- Join the session you have created by clicking on the session.
- Choose your audio tool.
- Click on 'menu' on the audio tool.
- Choose the format in which you want to send the audio.
- If you want to listen what you are talking click on loopback in the audio tests. click 'dismiss' after you are done.
- If you want to talk click on 'talk' on the audio tool and switch to microphone by clicking on the icon below 'talk'.
If you want to change the settings click on options. Click on mute to see your speakers are not muted. You can click on the icon below mute button to change your option of speakers. If you are using external speakers be careful to see that you have changed this setting.
- You have to create the session you want to transmit.
- Join the session you have created by clicking on the session.
- Choose your audio tool rat.
- Click on mute to make sure the microphone is not muted.
- Switch to microphone mode.
If there is no video transmitted you will get a message "no network sources" on the video tool. You can change your settings like frames per sec by clicking on the button "menu" on the video tool. We can also change the Kbps rate here. IF you need help click on help button on the video tool.
To transmit video you have to follow the following steps:
- Create a new session.
- The session will appear on your sdr interface.
- Click on the session and join the session.
- Click on menu on the video tool.
- Click on device and choose your video device. If it is sun click on sunvideo1. (If this doesn't work try sunvideo0).
- Click on port and click on composite-2 (or the port into which the video device is plugged)
- Adjust the rate and frames per second to the values at which you want to transmit.
- Click on transmit.
You can configure the tunnel by configuring the file /etc/mrouted.conf.
Configuration commands.
- phyint [disable] [metric ] [threshold ] (This command is used generally if we have two interfaces for MBone and if we want to disable one) CAUTION: Use phyint cautiously as it will disable MBone.
- tunnel scourceIP
destinationIP [metric ] [threshold ] The phyint command can be used
to disable multicast routing on the physical interface identified by
local IP address , or to associate a non-default metric or threshold
with the specified physical interface. Phyint commands should precede
tunnel commands. The tunnel command can be used to establish a tunnel
link between local IP address and remote IP address , and to associate
a non-default metric or threshold with that tunnel. The tunnel must
be set up in the mrouted.conf files of both ends before it will be used.
The keyword "srcrt" can be added just before the keyword "metric" to
choose source routing for the tunnel if necessary because the other
end has not yet upgraded to use IP encapsulation. Upgrading is highly
encouraged. If the methods don't match at the two ends, the tunnel will
appear to be up according to mrouted typeouts, but no multicast packets
will flow. The metric is the "cost" associated with sending a datagram
on the given interface or tunnel; it may be used to influence the choice
of routes. The metric defaults to 1. Metrics should be kept as small
as possible, because mrouted cannot route along paths with a sum of
metrics greater than 31. When in doubt, the following metrics are recommended:
- backup tunnels,
- LAN, or tunnel across a single LAN 1
- any subtree with only one connection point 1 serial link, or tunnel across a single serial link 1
- multi-hop tunnel 2 or 3
- sum of metrics on primary path + 1
The threshold is the minimum IP time-to-live required for a multicast datagram to be forwarded to the given interface or tunnel. It is used to control the scope of multicast datagrams. (The TTL of forwarded packets is only compared to the threshold, it is not decremented by the threshold. Every multicast router decrements the TTL by 1.) The default threshold is 1.
CAUTION: MTRACE should be run as root. We can also configure this so that any user without root privileges can make a trace route. To do this login as super user and make a chmod u+s on the executable.
NAME mtrace - print multicast path from a source to a receiver
SYNOPSIS
mtrace [ -g gateway ] [ -i if_addr ] [ -l ] [ -M ] [ -m max_hops ] [ -n ] [ -p ] [ -q nqueries ] [ -r resp_dest ] [ -s ] [ -S stat_int ] [ -t ttl ] [ -v ] [ -w waittime ] source [ receiver ] [ group ]DESCRIPTION
Assessing problems in the distribution of IP multicast traffic can be difficult. mtrace utilizes a tracing feature implemented in multicast routers (mrouted version 3.3 and later) that is accessed via an extension to the IGMP protocol. A trace query is passed hop-by-hop along the reverse path from the receiver to the source, collecting hop addresses, packet counts, and routing error conditions along the path, and then the response is returned to the requester.The only required parameter is the source host name or address. The default receiver is the host running mtrace, and the default group is "MBone Audio" (224.2.0.1), which is sufficient if packet loss statistics for a particular multicast group are not needed. These two optional parameters may be specified to test the path to some other receiver in a particular group, subject to some constraints as detailed below. The two parameters can be distinguished because the receiver is a unicast address and the group is a multicast address.
NOTE: For Solaris 2.4/2.5, if the multicast interface is not the default interface, the -i option must be used to set the local address.
OPTIONS -g gwy Send the trace query via unicast directly to the multicast router gwy rather than multicasting the query. This must be the last-hop router on the path from the intended source to the receiver.
CAUTION!! Versions 3.3 and 3.5 of mrouted will crash if a trace query is received via a unicast packet and mrouted has no route for the source address. Therefore, do not use the -g option unless the target mrouted has been verified to be 3.4 or newer than 3.5
-i addr Use addr as the local interface address (on a multi-homed host) for sending the trace query and as the default for the receiver and the response destination. -l Loop indefinitely printing packet rate and loss statistics for the multicast path every 10 seconds (see -S stat_int). -M Always send the response using multicast rather than attempting unicast first. -m n Set to n the maximum number of hops that will be traced from the receiver back toward the source. The default is 32 hops (infinity for the DVMRP routing protocol). -n Print hop addresses numerically rather than symbolically and numerically (saves a nameserver address-to-name lookup for each router found on the path). -q n Set the maximum number of query attempts for any hop to n. The default is 3. -p Listen passively for multicast responses from traces initiated by others. This works best when run on a multicast router. -r host Send the trace response to host rather than to the host on which mtrace is being run, or to a multicast address other than the one registered for this purpose (224.0.1.32). -s Print a short form output including only the multicast path and not the packet rate and loss statistics. -S n Change the interval between statistics gathering traces to n seconds (default 10 seconds). -t ttl Set the ttl (time-to-live, or number of hops) for multicast trace queries and responses. The default is 64, except for local queries to the "all routers" multicast group which use ttl 1. -v Verbose mode; show hop times on the initial trace and statistics display. -w n Set the time to wait for a trace response to n seconds (default 3)
EXAMPLES
The output of mtrace is in two sections. The first section is a short listing of the hops in the order they are queried, that is, in the reverse of the order from the source to the receiver. For each hop, a line is printed showing the hop number (counted negatively to indicate that this is the reverse path); the multicast routing protocol (DVMRP, MOSPF, PIM, etc.); the threshold required to forward data (to the previous hop in the listing as indicated by the up-arrow character); and the cumulative delay for the query to reach that hop (valid only if the clocks are synchronized). This first section ends with a line showing the round-trip time which measures the interval from when the query is issued until the response is received, both derived from the local system clock. A sample use and output might be:
oak.isi.edu 80# mtrace -l caraway.lcs.mit.edu 224.2.0.3 Mtrace from 18.26.0.170 to 128.9.160.100 via group 224.2.0.3 Querying full reverse path... 0 oak.isi.edu (128.9.160.100) -1 cub.isi.edu (128.9.160.153) DVMRP thresh^ 1 3 ms -2 la.dart.net (140.173.128.1) DVMRP thresh^ 1 14 ms -3 dc.dart.net (140.173.64.1) DVMRP thresh^ 1 50 ms -4 bbn.dart.net (140.173.32.1) DVMRP thresh^ 1 63 ms -5 mit.dart.net (140.173.48.2) DVMRP thresh^ 1 71 ms -6 caraway.lcs.mit.edu (18.26.0.170) Round trip time 124 ms
The second section provides a pictorial view of the path in the forward direction with data flow indicated by arrows pointing downward and the query path indicated by arrows pointing upward. For each hop, both the entry and exit addresses of the router are shown if different, along with the initial ttl required on the packet in order to be forwarded at this hop and the propagation delay across the hop assuming that the routers at both ends have synchronized clocks. The right half of this section is composed of several columns of statistics in two groups. Within each group, the columns are the number of packets lost, the number of packets sent, the percentage lost, and the average packet rate at each hop. These statistics are calculated from differences between traces and from hop to hop as explained above. The first group shows the statistics for all traffic flowing out the interface at one hop and in the interface at the next hop. The second group shows the statistics only for traffic forwarded from the specified source to the specified group.
These statistics are shown on one or two lines for each hop. Without any options, this second section of the output is printed only once, approximately 10 seconds after the initial trace. One line is shown for each hop showing the statistics over that 10-second period. If the -l option is given, the second section is repeated every 10 seconds and two lines are shown for each hop. The first line shows the statistics for the last 10 seconds, and the second line shows the cumulative statistics over the period since the initial trace, which is 101 seconds in the example below. The second section of the output is omitted if the -s option is set.
Waiting to accumulate
statistics... Results after 101 seconds:
Source Response Dest Packet Statistics For Only For Traffic 18.26.0.170
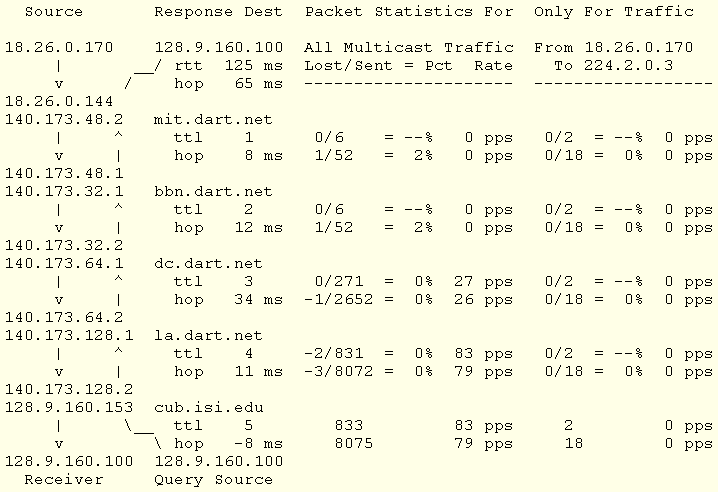
Because the packet counts may be changing as the trace query is propagating, there may be small errors (off by 1 or 2) in these statistics. However, those errors should not accumulate, so the cumulative statistics line should increase in accuracy as a new trace is run every 10 seconds. There are two sources of larger errors, both of which show up as negative losses:
- If the input to a node is from a multi-access network with more than one other node attached, then the input count will be (close to) the sum of the output counts from all the attached nodes, but the output count from the previous hop on the traced path will be only part of that. Hence the output count minus the input count will be negative.
- In release 3.3 of the DVMRP multicast forwarding software for SunOS and other systems, a multicast packet generated on a router will be counted as having come in an interface even though it did not. This creates the negative loss that can be seen in the example above.
Note that these negative losses may mask positive losses.
In the example, there is also one negative hop time. This simply indicates a lack of synchronization between the system clocks across that hop. This example also illustrates how the percentage loss is shown as two dashes when the number of packets sent is less than 10 because the percentage would not be statistically valid.
A second example shows a trace to a receiver that is not local; the query is sent to the last-hop router with the -g option. In this example, the trace of the full reverse path resulted in no response because there was a node running an old version of mrouted that did not implement the multicast traceroute function, so mtrace switched to hop-by-hop mode. The Route pruned error code indicates that traffic for group 224.2.143.24 would not be forwarded.
oak.isi.edu 108# mtrace -g 140.173.48.2 204.62.246.73 \ butter.lcs.mit.edu 224.2.143.24 Mtrace from 204.62.246.73 to 18.26.0.151 via group 224.2.143.24 Querying full reverse path... * switching to hop-by-hop: 0 butter.lcs.mit.edu (18.26.0.151) -1 jam.lcs.mit.edu (18.26.0.144) DVMRP thresh^ 1 33 ms Route pruned -2 bbn.dart.net (140.173.48.1) DVMRP thresh^ 1 36 ms -3 dc.dart.net (140.173.32.2) DVMRP thresh^ 1 44 ms -4 darpa.dart.net (140.173.240.2) DVMRP thresh^ 16 47 ms -5 * * * noc.hpc.org (192.187.8.2) [mrouted 2.2] didn't respond Round trip time 95 ms