
MENU
MISTC Home
Dowloading--
System Rqmts
Client Downloads
Server Download
Using--
Help
Problems & Ideas
MISTCFeatures
Presenter Guide
FAQs
Documents--
Documentation
MISTCPeople
Related Websites--
MoodleTM
NetLab Home
PRESENTER GUIDE
TEACHING AND CONFERENCING WITH

MISTC was
developed to be easy to use; still, it helps to have some basic directions. The following was
written to give new users of
MISTC a quick start.
Getting Started
After downloading your
MISTC client,
you will bring up MISTC
through the Learning Management System Moodle. Just log in to your course and
use the link there to connect to the live session you want.
You may also launch MISTC
off-line.
In either case, the
MISTC
display will appear:
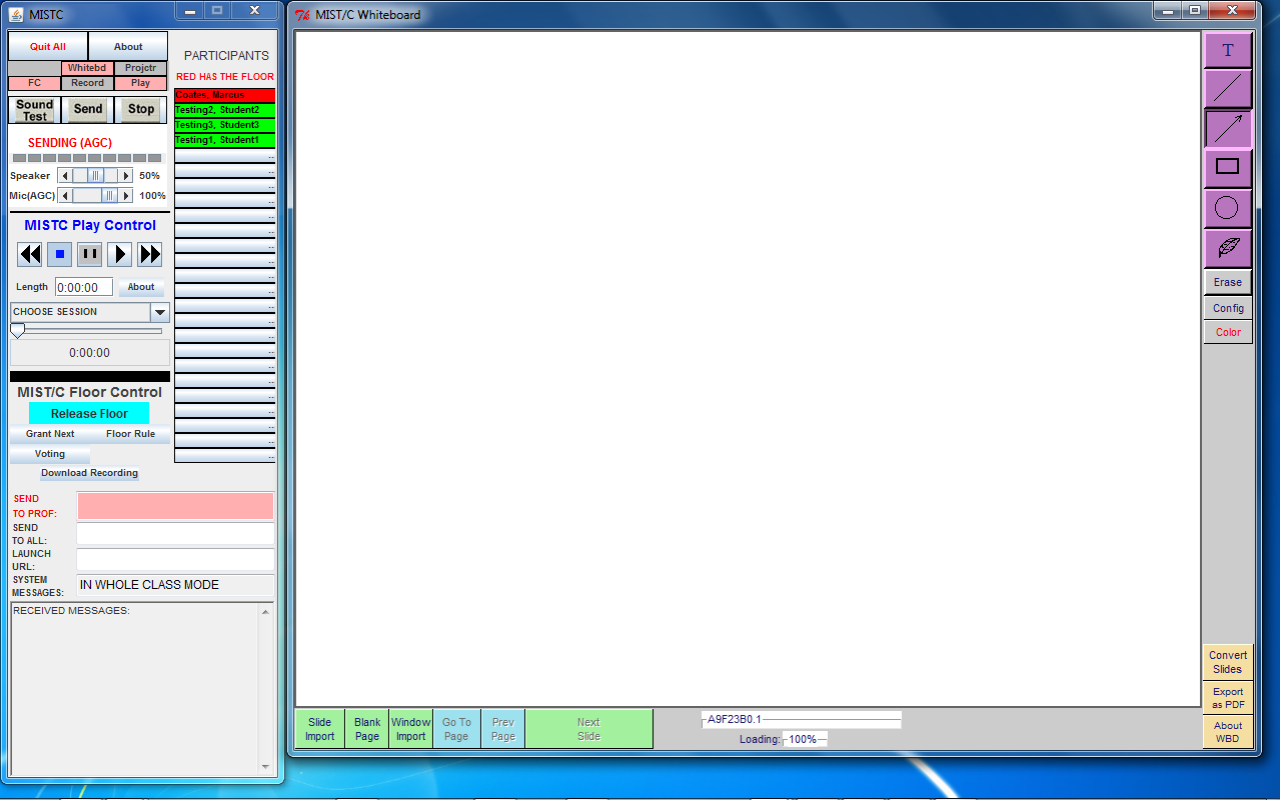
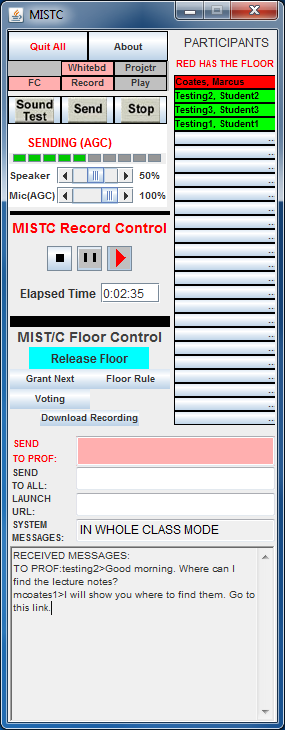
Choose your Options
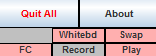
You can include the MISTC
tools that you want for your presentation from the buttons on the top of the tool window. As you
can see below, you are given the Floor Control and the Whiteboard by default. You may
add the Recorder, the Player and/or an extra Projector display by using the buttons.
 |
 |
Sending Audio
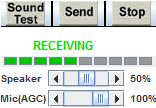
A guiding principle of MISTC is that good audio is essential. The Speak Freely audio tool is one of the best anywhere. We have added a compact interface with all the controls in one easy place. It is set up to start sending when you take the floor or, for a student, when you hand over the floor. The gray buttons at the top of the control are for when you are using the recorder in standalone mode.
You should always run a sound test when you connect. To run the sound test, use the Sound Test button to capture and play back a few words. The speaker slide sets the listen volume. The mic slide sets the talking volume. The bouncing bar shows the speech level. Both the slides should show green blocks up to the yellow block in the bouncing bar during the sound test.
 |
 |
Normally, you should click on REQUEST FLOOR in the Floor Control to speak; but when you already have the
floor, you can use Stop to mute sending and Send to start it again.You can tell the mode of the
audio by the color of the status description in the interface.
AGC means automatic gain control, which is another way of saying it takes care of itself. But
there is one part of audio where it cannot do the work for you: unless the students in the classroom
have microphones you will need to REPEAT THE QUESTION asked, so the online students know what
was asked. You may want to deputize a student in the classroom to help you remember to do this.
Seize the Floor
To talk, write on the whiteboard, launch a URL or launch an application, you must
have the "floor." If you are the teacher, you
also will be designated a floor controller which means you get the floor
anytime you ask for it. This is also true for anybody in a conference with an
uncontrolled floor: No need to ask, just click on the bright pink button:
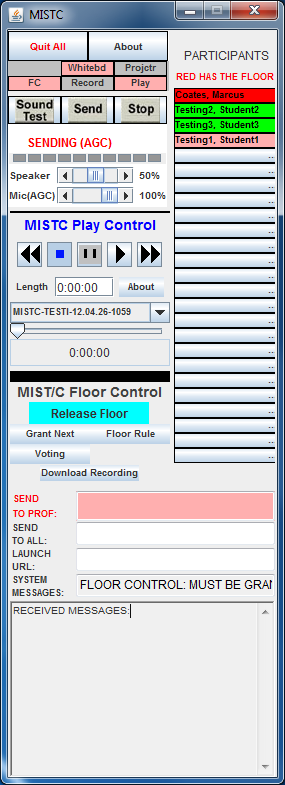 |
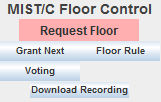
You can voluntarily give up the floor by clicking again the same button, which now will be bright blue: 
|
As a controller, you can take the floor away from the current floorholder (the one
whose cell is red) by clicking Request Floor. In most cases when you are
teaching, your students will not have this option.
| |
When a student clicks Request Floor you will hear a chime and a red ATTENTION sign will appear
on the whiteboard. The cell of the requesting client will turn pink. To give that student the floor,
you can click on the pink cell. Remember, as controller you can reclaim the floor any time.

In the conference mode, the first user to claim the floor, will be designated the default floor holder. Thus, when the floor is released, it automatically returns to the default floor holder. If the floor is released by the default floor holder, then no one has the floor. The default floor holder policy is not currently used with breakout rooms.
If a student disconnects from
MISTC
the corresponding cell will turn gray.

|
Multiple Whiteboard Entry:
The multiple whiteboard entry feature allows the instructor to input from a whiteboard on
a computer other than the teaching computer. This feature gives the instructor the ability
to prepare a special presentation and bring it to class. This is especially useful when the
Window Import function is used (see below) to capture the display of an application running
on the second computer. Whatever is entered into the whiteboard on second computer is
displayed on all the other whiteboards in the session, despite the fact the second computer
is not floorholder.
To initiate the second whiteboard, the instructor must login to Moodle using a second account,
connect to MISTC,
and take the floor once from that computer and then yield the floor,
after which the whiteboard on that computer will remain able to enter graphics in the MIST/C
session.
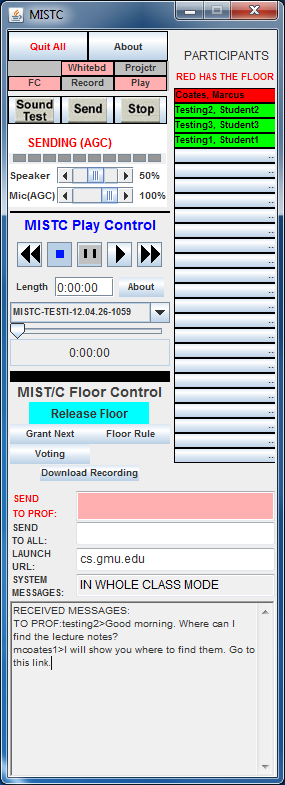
Floor Control Chat and URL Launch
The floor control has a built-in chat feature. This is handy when someone's sound is not working
or you do not want to make noise. It also lets students who are not set up for sound send
questions and comments.
As marked on the floor control panel, the student has two options for chat:
SEND TO PROF, which goes only to controllers, or
SEND TO ALL,
which does what it says:
| |
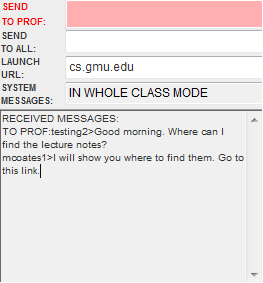 |
Another input space illustrated above and worth noting is
LAUNCH URL. When you
type a URL here, a browser will launch on each
MISTC
desktop and attempt to load the URL from the Internet. Although you have no control over the format
(browsers vary widely), this can be a very timely feature.
The Whiteboard
As long as your microphone is working, you can pretty much forget about the audio. You need to
focus on the other critical component of teaching: graphic presentation. The
MISTC whiteboard is
a very flexible tool that will let you present your slides and annotate them. Everything you see on
the whiteboard is also sent to all other whiteboards in the session within a few seconds.
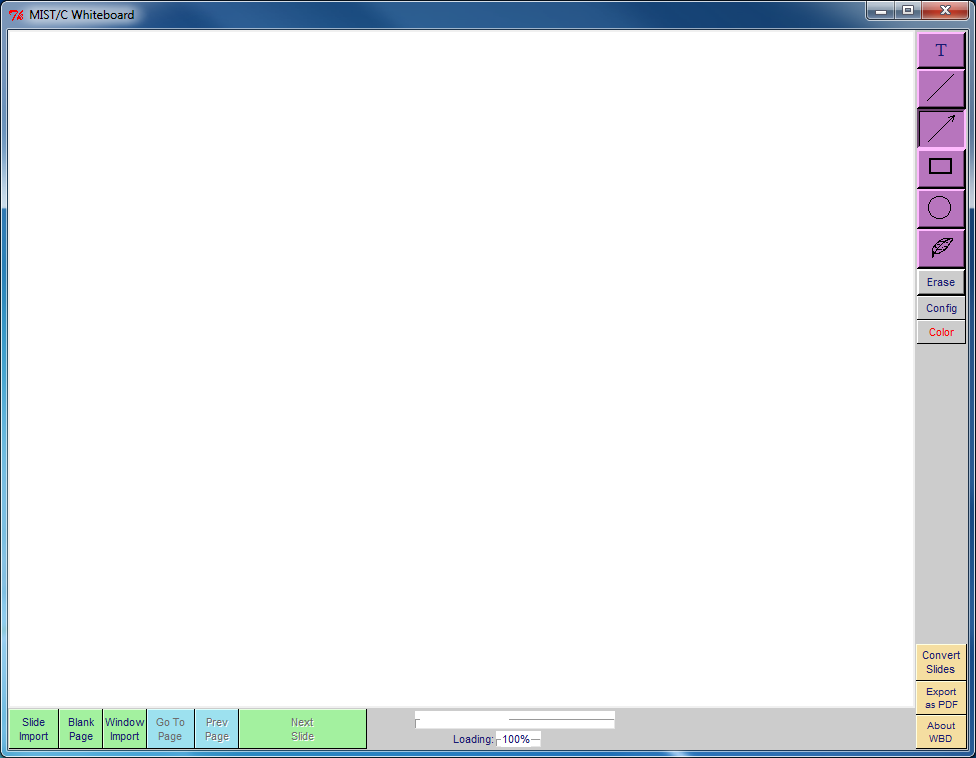
The buttons across the bottom of the board are those that manage whole pages. The options
here cover anything from photographs, to PowerPoint and LaTeX slides, to contents of any window
active on the teaching computer, to plain old typing and handwriting.
The buttons on the upper right edge of board are tools for annotating slides and
blank pages. You can enter text
(T),
draw lines, arrows, rectangles, and ellipses, or write freehand (for this, a tablet
input is recommended).
Convert Slides button
At the lower right edge of the whiteboard is the
Convert Slides button that will accept a multi-page
file and break it up into the single-page PDF or JPEG files used with the whiteboard. It also will
perform other handy tricks. See MISTCDATA/INFO/CONVERT-INFO.txt for details.
Convert Slides supports only static slides.It will not reproduce PowerPoint effects such as zoom-in and fade-in. In addition, the 'transparent' feature is not usable.
The maximum file size for a slide in any format is 128KB. This limit is set inside MISTC and can be changed if slow transmitting modem links are not used. In the case of JPEG slides, the whiteboard will accept a larger file and attempt to reduce its size by recoding to a lower quality JPEG. The whiteboard will attempt to convert oversize PDF and PNG files to JPEG for this purpose.
To use Open Office for conversion, simply install version 3 of Open Office. With Open Office, you can convert .ppt, .pptx, and .odp files.
Convert Slides does have one annoying requirement, if you are using Powerpoint: you must install the HP Color LaserJet 8500 PS driver in order for it to work. See Windows file C:\Program Files\MISTC\CONVERT\CONVERT-INFO.txt. However, you do not need this driver to convert using Open Office or to use 'Convert Slides' on a multiple PDF file.
Lastly, a note about the part of the whiteboard that is not user-proof: it cannot keep you from pointing at the screen when you should be using the arrow. Those online do not see you point. Here again, you might ask an on-the-ball student to remind you: DO NOT POINT AT THE SCREEN.
Record Control
Another tool in the
MISTC teaching
setup is the control for the recorder that makes your class available at all hours of the day and night. The
Record Control is so simple that there is not much to say about it.
 |
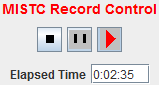 |
The record control features a set of popup signs which are intended to be downright annoying
until you start the recorder, send it audio, and send it a slide. This last point is a little subtle:
the recorder captures only what happens while it is running. If you load a slide to the whiteboard
and then start recording, that slide will not show up in the playback. (If you forget and load the slide
first, you can simply load it again after starting the recorder.)
You can pause the recorder for a break. When you do this, another helpful sign will appear until you
start it again. When you stop the recorder, the file is terminated. But you can choose to append to it
when you start again on the same day.
You can make a recording without a server connection using
OFFLINE.nwm in the MISTC directory. (See
offline.)
A separate recording (without pauses) is made on the server when MISTC is so configured. If you have instructor
privileges, you can download that recording using the button Download Recording in the Floor Control panel.
Playback Control
The recording will be saved in your local RECORDINGS directory in your MISTCDATA folder.
To play locally, double-click on the file in RECORDINGS. The filename will be made like this:
MoodleShortName-Year-Month-Day-TimeofDay.nwr
You can change any part of the filename except the nwr extension as long as the name is less than
40 characters long. You can then upload it to Moodle, where it will be available to your students.
 |
 |
Live Video
MISTC uses a
great Internet video tool called VIC. Because video eats up computer and network capacity, we
set VIC for slow frame rates and small pictures, even though it is capable of good
quality video. This is consistent with the fact that most students report they
gain very little educational value from a talking head. We generally do not
record video, for the same reason. But it is there for students with broadband
Internet, and many do connect.
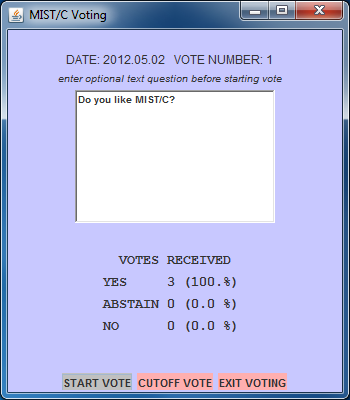
Voting
MISTC provides
for taking a vote among the students logged into a live session. Using the "Voting" link under
the REQUEST FLOOR button, you can initiate and tally the votes.
Application Launching
MISTC will handle
Application Launching for the student users. Window Import is
useful for capturing many visuals, but some applications produce rapidly moving images that simply
can't be transmitted in real time. Examples are video players and graphics programs. MIST/C lets you
teach with those by launching the application on users' desktops, under your control as presenter.
More information on Application Launching.
Breakout Groups:
MISTC Data Files
While a MISTC
classroom session is in progress,
MISTC can break the
online group into as many as nine subgroups. Subgroup members can communicate among themselves, using
the audiographic features of MISTC.
Breakout subgroups may be saved and restored in subsequent classroom sessions.
More information on Breakout Groups.
The
MISTC
client stores
MISTC
data files on its computer. For Windows computers, other than Windows VISTA, the data files will be found
in My Documents/MISTCDATA/ and for MacOS X, Linux and Windows VISTA computers the data files will be
found in Documents/MISTCDATA/.
The MISTCDATA directory contains these subdirectories:
Uploading Recordings and Slides
(For instructions to upload a file or recording to a folder, see below.)
The following illustrations show how to upload recordings and slides from the MISTCDATA subdirectories to your
Moodle course.
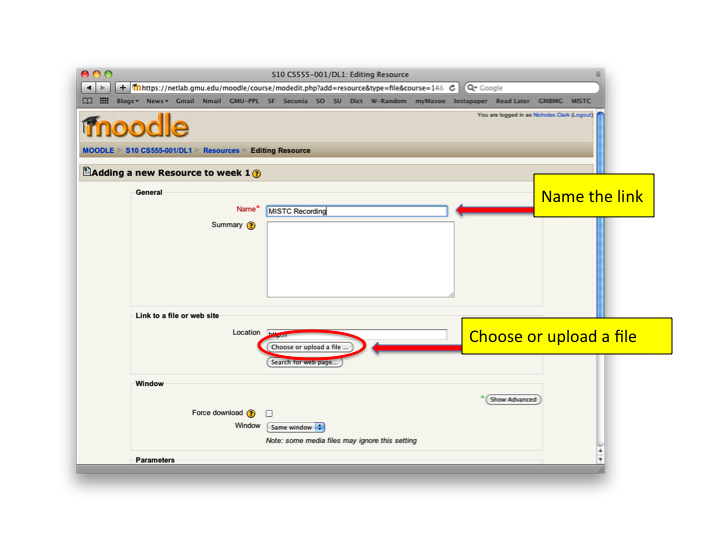
First, turn on editing and add the resource "File" in your course home page to the session where the link should appear.Next, name your link as it will appear on your course and click on the "Choose or upload a file" button.
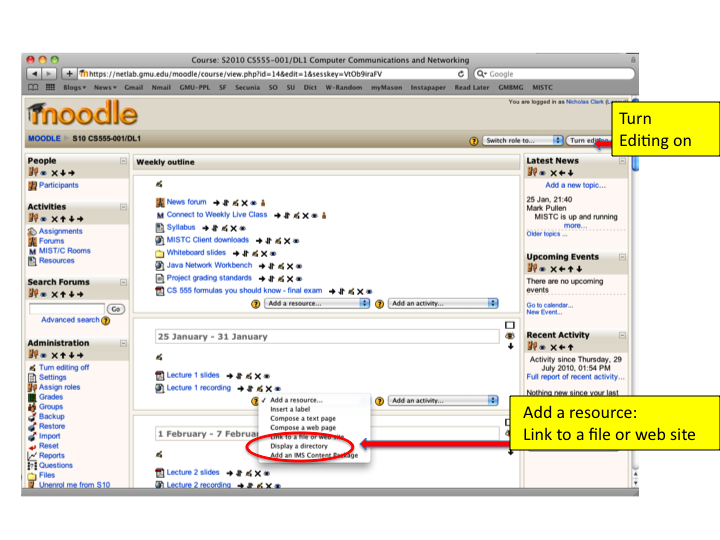
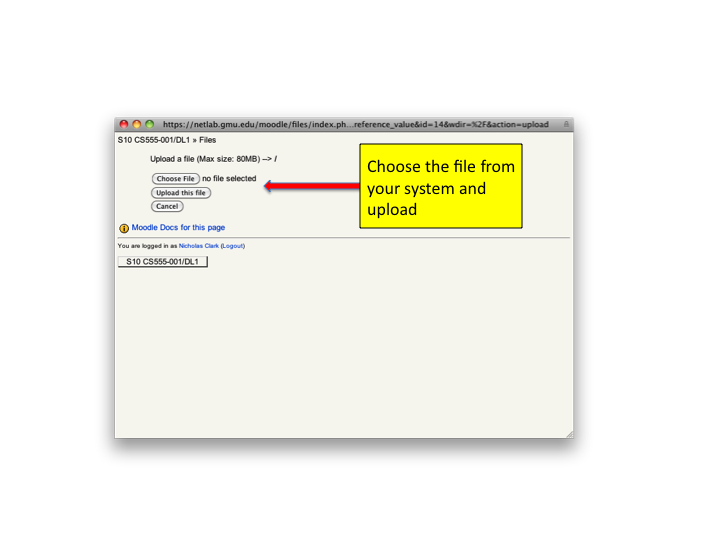
If you are uploading a new file, just click the "Upload file" button on this page.
However, if you are linking a file from your Moodle file storage area,
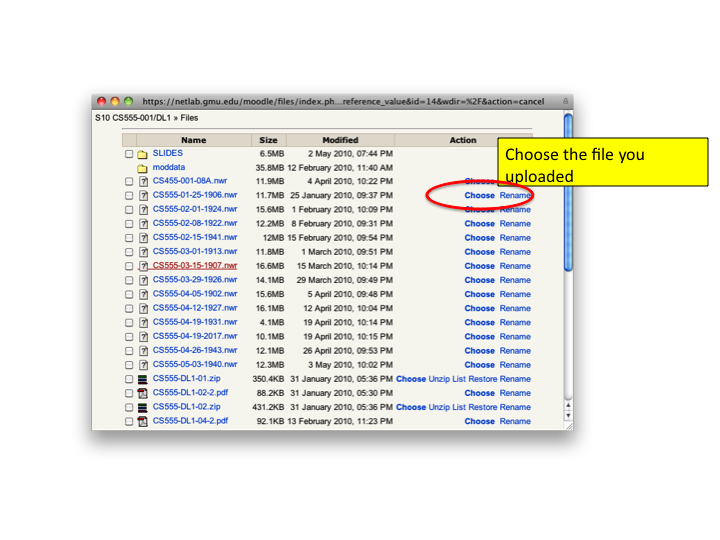
choose your file from the list, then click the "Upload file" button.To place your new file in the Moodle storage area, find and select your file,
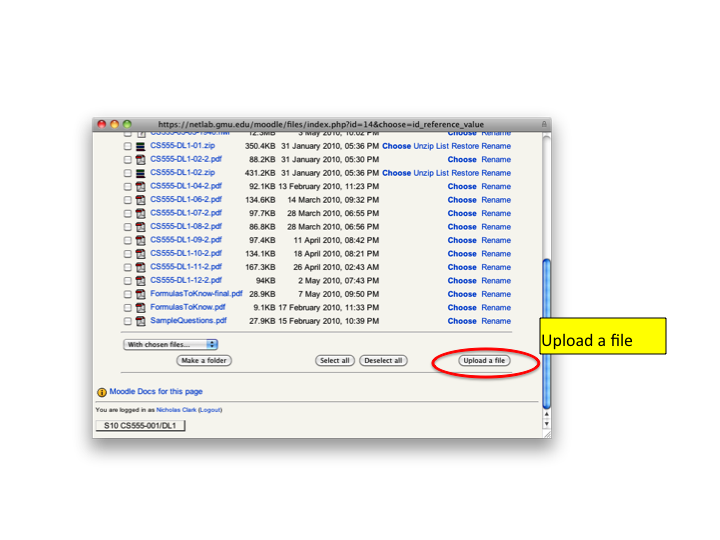
then upload it using these buttons illustrated below.Then you can choose the file from the storage list and click the "Upload file" button.
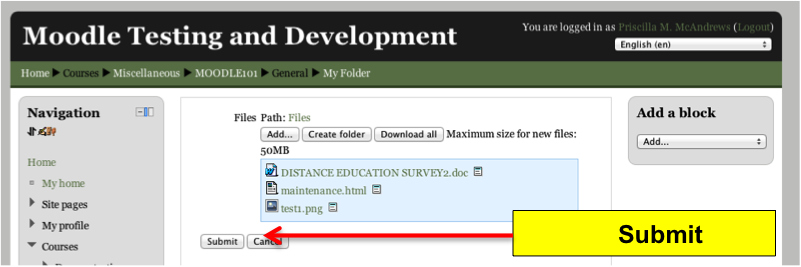
Uploading Recordings and Slides to a Folder
The following illustrations show how to upload recordings and slides to a folder created in your
Moodle course.
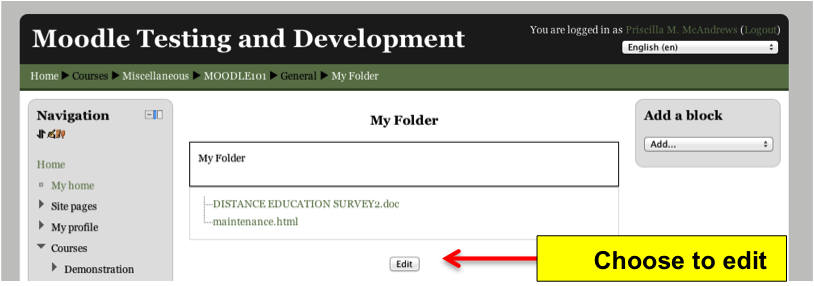
First, turn on editing. If you need to create a folder, add the resource "Folder" in your course home page. Otherwise, choose the folder already in your course home page.Next, click on the "Edit" button for the folder.
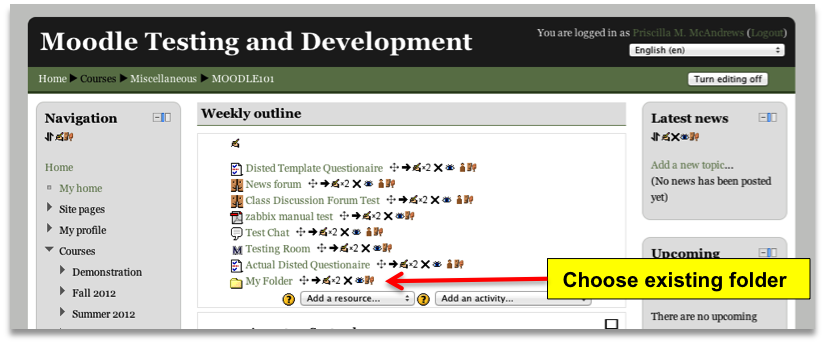
And then the "Add" button.
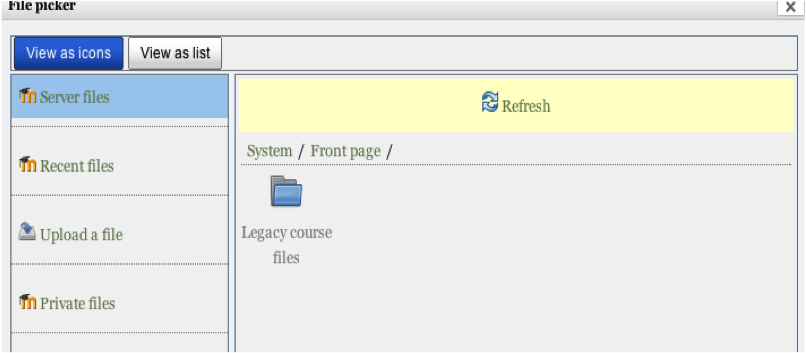
Now, select your file to be added to the folder.
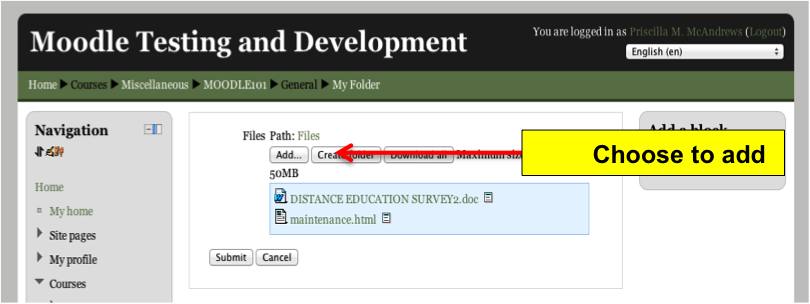
And click on the "Submit" button.
Launching MISTC Offline
Go to your Documents folder and open the MISTCDATA folder. Double-click the OFFLINE.nwm file to launch the MISTC client. (On MacOSX and Windows, you can copy OFFLINE.nwm to your Desktop or elsewhere - it will launch MISTC no matter where you saved it.)
Recording with MISTC Offline
After starting the MISTC client, click the RECORD button at the top of the control box to open the "MISTC Record Control" window. (See Record Control above). Click the record indicator to begin recording. To end the recording, click the stop indicator on the record control. Your recording will be saved in the RECORDINGS folder within the MISTCDATA folder on your computer. For Offline recording, you must click SEND to start the audio capturing sound (when you are online, REQUEST FLOOR does this automatically).
Playing MISTC Recordings
Of course, there is more to know about MISTC, but probably you would rather get on with your class or conference. It is really pretty simple! Please help us make it better by reporting problems and suggesting improvements to: mistchelp@netlab.gmu.edu